BY Marcus Kennan 12 February 2018
Welcome to the second in a two part series on understanding the messaging API callbacks. In our first post we covered using postman and setting up to handle the message callback. If you haven’t yet read the first post you can check that out at Understanding Messaging API Callbacks - Part 1.
Sample code in this blog post is taken from the Happy Chat demo app available on our GitHub and is written in node.js and Angular 5.
Receiving delivery notifications for SMS and MMS messages using callbacks
Now that we can receive messages from our users using the messaging API, it would be nice to also know if messages we send to them are making it to their destination. We can also use callbacks to acheive this, but it works a little differently from how we set them up to receive messages.
With every SMS or MMS request we have the option to specify a notifyURL, this is not to be confused with the same notifyURL we set up when provisioning. This notifyURL will be the one that delivery notification are sent too. This can get a little bit confusing, so lets break it down quickly:
- The notifyURL sent with provisioning will be where received messages are sent to.
- The notifyURL sent with an individual SMS or MMS request is where a delivery notification will be sent to.
By using the delivery notification callback we can quickly check if a message was sent successfully or if it failed without having to poll that message manually. To test this out we can use the same request bin we set up before or you can set up a new one if you prefer.
First, send an SMS again but this time include the notifyURL and set the value to the request bin URL:
{
  "to":"+61...",
  "body":"hello!",
  "notifyURL": "https://requestb.in/u74vmvu7"
}
Pay attention to the messageID parameter in the response here, we'll see it again later when we get the delivery notification callback.
If you refresh rquest bin in your browser, you should see that the delivery notification callback has been successful

As you can see, we can view the sent and receieved timestamps, the phone number the message was sent to, the message ID and the delivery status of the message. The messageID here should match up with the messageID in the response you got back when sending the SMS initially.
In this example, the deliveryStatus is DELIVRED meaning that the message has been sent and received by the recipient in the from field successfully. Try experimenting with different to addresses or turn your phone off and check the deliveryStatus value to see the different values you can expect here and the cirumstances that result in these values, additonally you can also check out our documentation for more details too.
A cool feature of the delivery notification callback is that it also work with the message broadcast funtionality of the messaging API. No matter how many recipients you specify in the to parameter of the message request, each individual message will have its own delivery notification callback.
Getting callback data into your development app
By using request bin and Postman together you can simulate how you want to use callback data within your app without having hosted endpoint for the callback data to be sent to. The callback data is a POST call, so you could set up a route on a locally running server and use Postman to POST to this route using data from request bin. For example, you could run a node.js express server at localhost:8080 and set up some routes like this:
// message status
router.post('/messageStatus', (req, res, next) => {
  // message status data in req.body

  res.status(200).json(req.body);
});

// receive message
router.post('/receiveMessage', (req, res, next) => {
  // message data in req.body

  res.status(200).json(req.body);
});
You can then copy and paste the delivery status data/ received message data from request bin, put it into a request body in Postman and make a POST call to your defined route:
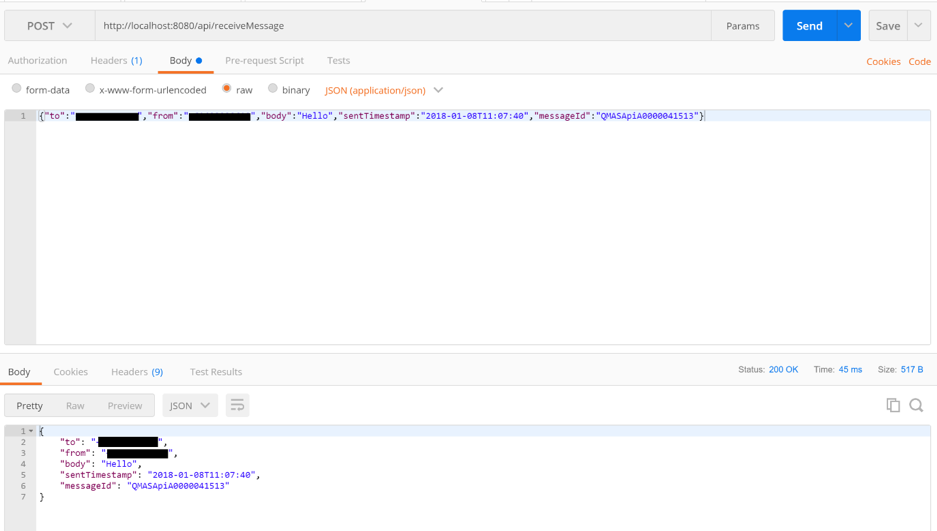
Remember to set the Content-Type: application/json header in the headers in Postman when doing this.
Hopefully this blog post has helped you to better understand how callbacks work in the messaging API and how to get started with using them even without a dedicated hosted URL to send callback data to.
Thanks for reading and happy coding!